title: Nginx简单使用 author: 小小千辰 tags:
- Nginx categories:
- 千辰的小小笔记 abbrlink: bfba28e1 date: 2022-06-21 18:15:04
Nginx概述
Nginx介绍
Nginx是一款轻量级的Web 服务器/反向代理服务器及电子邮件(IMAP/POP3)代理服务器。其特点是占有内存少,并发能力强,事实上nginx的并发能力在同类型的网页服务器中表现较好,中国大陆使用nginx的网站有:百度、京东、新浪、网易、腾讯、淘宝等。
Nginx是由伊戈尔·赛索耶夫为俄罗斯访问量第二的Rambler.ru站点(俄文:Рамблер)开发的,第一个公开版本0.1.0发布于2004年10月4日。
官网地址

正向代理
是一个位于客户端和原始服务器(origin server)之间的服务器,为了从原始服务器取得内容,客户端向代理发送一个请求并指定目标(原始服务器),然后代理向原始服务器转交请求并将获得的内容返回给客户端。 正向代理的典型用途是为在防火墙内的局域网客户端提供访问Internet的途径。 正向代理一般是在客户端设置代理服务器,通过代理服务器转发请求,最终访问到目标服务器。

反向代理
反向代理服务器位于用户与目标服务器之间,但是对于用户而言,反向代理服务器就相当于目标服务器,即用户直接访问反向代理服务器就可以获得目标服务器的资源,反向代理服务器负责将请求转发给目标服务器。 用户不需要知道目标服务器的地址,也无须在用户端作任何设定。
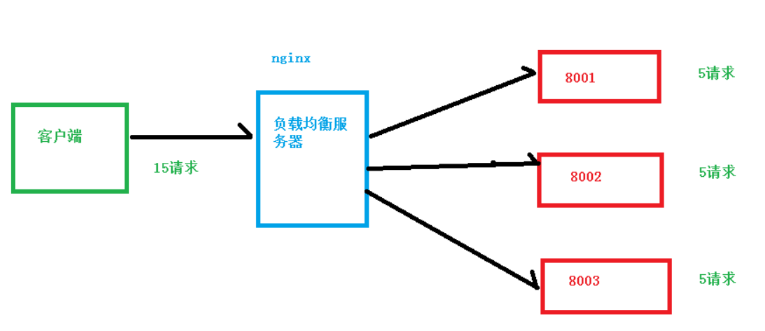
负载均衡
增加服务器的数量,然后将请求分发到各个服务器上,将原先请求集中到单个服务器上的情况改为将请求分发到多个服务器上,将负载分发到不同的服务器,也就是我们所说的负载均衡。
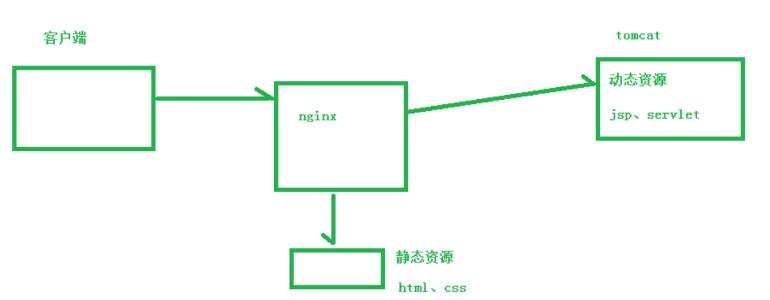
动静分离
Nginx安装
- 安装依赖包
yum -y install gcc pcre-devel zlib-devel openssl openssl-devel - 下载Nginx安装包
wget https://nginx.org/download/nginx-1.16.1.tar.gz- 或者下载地址:Linux下载地址
- 解压
tar -zxvf nginx-1.16.1.tar.gz cd nginx-1.16.1./configure --prefix=/usr/local/nginxmake && make install
执行完全部命令你会在
/usr/local/下面得到如下文件夹

Nginx添加全局变量
此时你只能在/sbin目录下执行nginx的相关命令,输入以下命令将Nginx添加到全局变量。
ln -s /usr/local/nginx/sbin/nginx /usr/local/bin/
Nginx目录结构
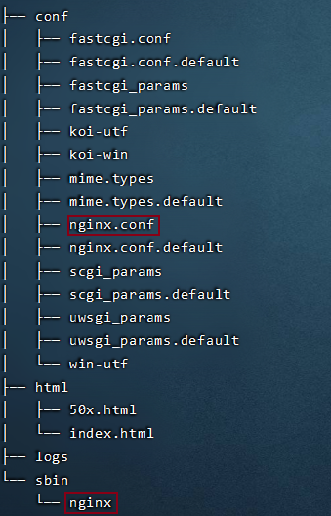
重点目录 / 文件
| 目录 / 文件 | 作用 |
|---|---|
conf/nginx.conf | nginx配置文件 |
html | 存放静态文件(HTML、CSS、JS等) |
logs | 日志目录,存放日志文件 |
sbin/nginx | 二进制文件,用于启动、停止Nginx服务 |
Nginx的常用命令和配置文件
Nginx常用命令
| 命令 | 作用 |
|---|---|
nginx -v | 查看版本 |
nginx -t | 检查配置文件的正确性 |
nginx | 启动Nginx服务 |
nginx -s stop | 停止nginx服务 |
nginx -s reload | 重新加载配置文件 |
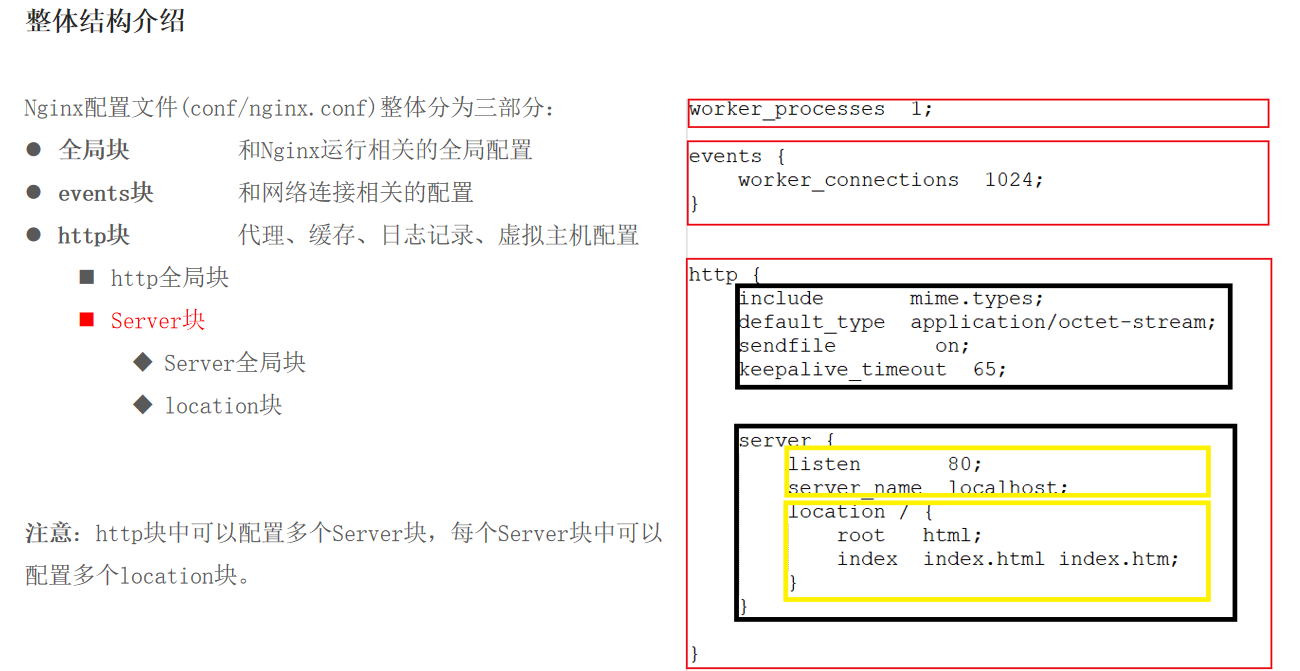
Nginx配置文件结构
Nginx的配置实例
反向代理
# 反向代理
server {
    listen  80;
    server_name localhost;

    location / {
        root  html;
        proxy_pass http://localhost:8080;
        index index.html index.htm;
    }
}

server {
    listen  9001;
    server_name localhost;

    location ~ /edu/ {
        proxy_pass http://localhost:8080;
    }
    location ~ /vod/ {
        proxy_pass http://localhost:8081;
    }
}
负载均衡
# 负载均衡
upstream myserver {
    server 192.168.200.100:8080;
    server 192.168.200.100:8081;
}

server {
    listen  81;
    server_name 192.168.200.100;

    location / {
        # 加上负载均衡的名称
        proxy_pass http://myserver;
        root    html;
        index index.html index.htm;
    }
}
动静分离
# 动静分离
server {
    listen  9000;
    server_name 192.168.200.100;

    location /www/ {
        # 请求的是 /www目录
        root    /data/;
        index   index.html index.htm;
    }

    location /image/ {
        root    /data/;
        autoindex on;
        autoindex_exact_size off;
        autoindex_localtime on;
    }
}
高可用集群
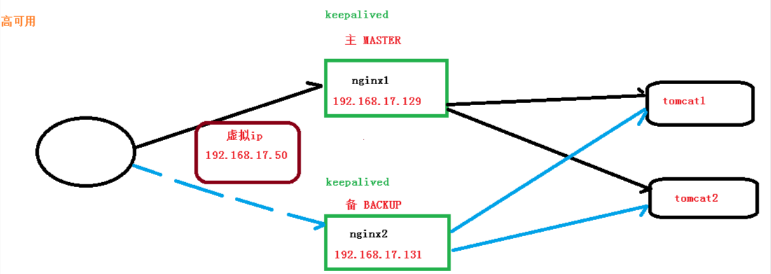
前置条件:需要两台装有
nginx和keepalived的虚拟机
步骤:
-
安装
keepalivedyum install keepalived –y -
安装之后,在
etc目录下生成目录keepalived,有文件keepalived.conf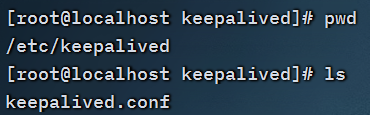
-
修改 keepalived.conf 文件
global_defs {

notification_email {
  acassen@firewall.loc
  failover@firewall.loc
  sysadmin@firewall.loc
}

notification_email_from Alexandre.Cassen@firewall.loc
  # 主服务器地址,需要更改
  smtp_server 192.168.200.100
  smtp_connect_timeout 30
  router_id LVS_DEVEL
}

vrrp_script chk_http_port {
  # 脚本存放位置
  script "/usr/local/src/nginx_check.sh"
  interval 2	#(检测脚本执行的间隔)
  weight 2
}

vrrp_instance VI_1 {
  state MASTER	# 备份服务器上将 MASTER 改为 BACKUP
  interface ens33	// ifconfig可以查看网卡
  virtual_router_id 51	# 主、备机的 virtual_router_id 必须相同
  priority 100	# 主、备机取不同的优先级,主机值较大,备份机值较小
  advert_int 1
  authentication {
    auth_type PASS
    auth_pass 1111
  }
  virtual_ipaddress {
    192.168.200.50 // VRRP H 虚拟地址
  }
}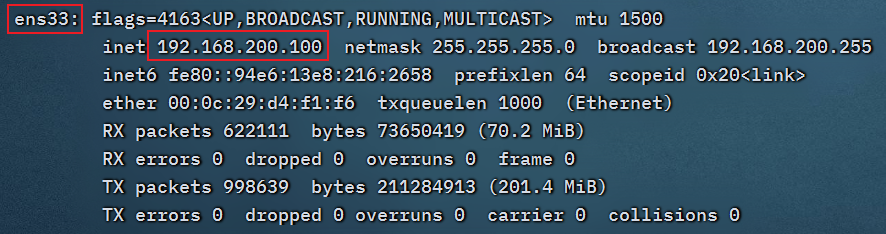
-
在
/usr/local/src/添加nginx_check.sh脚本文件#!/bin/bash A=`ps -C nginx –no-header |wc -l` if [ $A -eq 0 ];then /usr/local/nginx/sbin/nginx sleep 2 if [ `ps -C nginx --no-header |wc -l` -eq 0 ]; then killall keepalived fi fi
从服务器重复配置步骤3和步骤4。
- 配置好后访问虚拟IP即可(192.168.200.50)。