title: SpringBoot开发 abbrlink: d3394559 date: 2022-02-03 18:57:03 tags:
- Spring categories:
- 千辰的小小笔记
配置高级
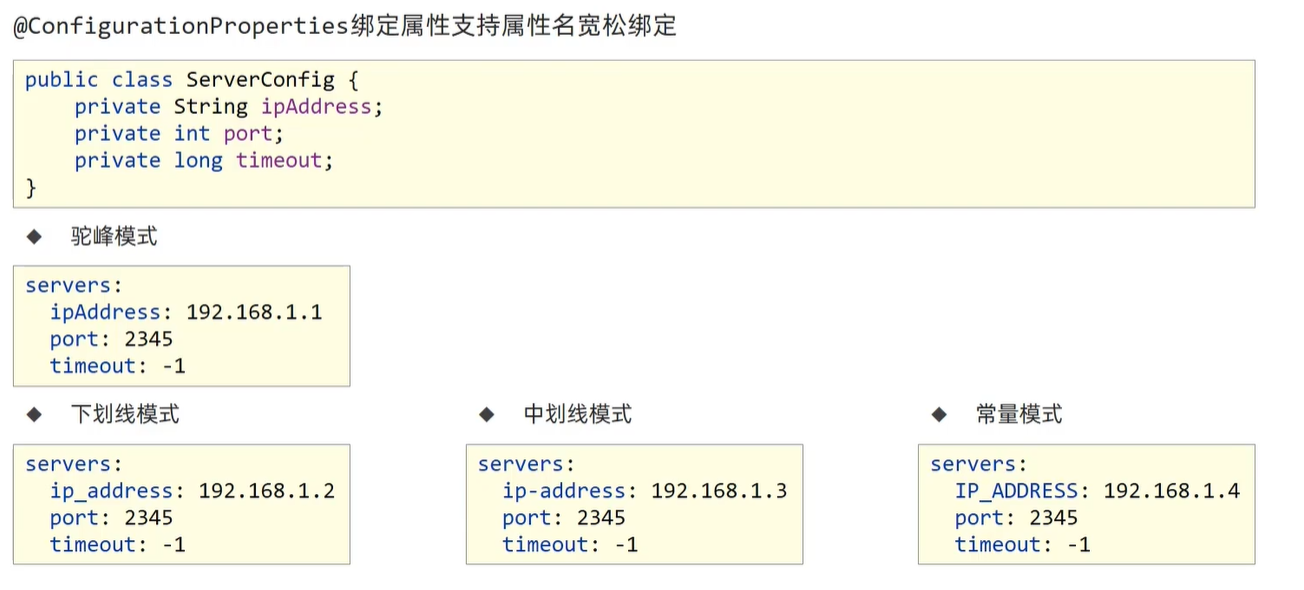
@ConfigurationProperties
@ConfigurationProperties可以为第三方bean绑定属性。也就是将yaml文件里面的数据封装到实体类里面。
@EnableConfigurationProperties注解可以将使用@ConfigurationProperties注解对应的类加入Spring容器,也就是代替了@Component。
@SpringBootApplication
@EnableConfigurationProperties(ServerConfig.class)
public class SpringBoot11ConfigurationApplication {
}
//@Component
@Data
@ConfigurationProperties(prefix = "servers")
public class ServerConfig {
    private String ipAddress;
    private int port;
    private long timeout;
}
注意: @EnableConfigurationProperties和@Component不能同时使用
配置文件:
servers:
  ip-address: 192.168.0.2
  port: 8080
  timeout: 20
松散绑定
中划线模式(烤肉串模式)是被推荐的。
 宽松绑定
宽松绑定
注意:宽松绑定不支持注解@Value引用单个属性的方式。
@Bean
@ConfigurationProperties(prefix = "datesource")
public DruidDataSource datasource() {
    DruidDataSource ds = new DruidDataSource();
    return ds;
}
注意:绑定前缀名命名规范:仅能使用纯小写字母、数字、下划线作为合法的字符。
常用计量单位
SpringBoot支持JDBK8提供的时间与空间计量单位
@Component
@Data
@ConfigurationProperties(prefix = "servers")
public class ServerConfig {
    private String ipAddress;
    private int port;
    private long timeout;
    @DurationUnit(ChronoUnit.HOURS) // 小时
    private Duration serverTimeOut;
    // @DataSizeUnit(DataUnit.MEGABYTES) // 如果配置文件直接使用了单位,该注解不需要提供
    private DataSize dataSize;
}
servers:
  ip-address: 192.168.0.1
  port: 8080
  timeout: 20
  dataSize: 10MB # 最后显示的数据是换算成B的数字
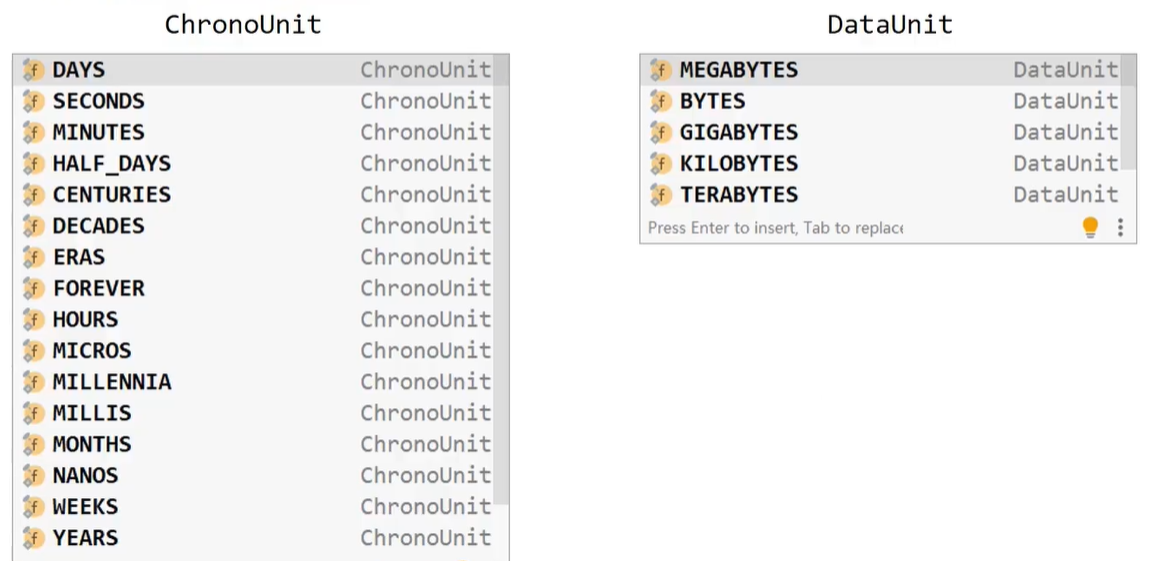 时间与空间计量单位
数据校验
-
导入坐标
这两个坐标的关系:JSOR303规范相当于JDBC作为接口,hibernate提供的校验器相当于mysql驱动作为实现类。
<!--1.导入JSR303规范--> <dependency> <groupId>javax.validation</groupId> <artifactId>validation-api</artifactId> </dependency> <!--使用hibernate框架提供的校验器做实现类--> <dependency> <groupId>org.hibernate.validator</groupId> <artifactId>hibernate-validator</artifactId> </dependency> -
开启对Bean的校验功能
@Component @Data @ConfigurationProperties(prefix = "servers") // 2.开启对当前bean的属性注入校验 @Validated public class ServerConfig { } -
设置校验规则
@Component
@Data
@ConfigurationProperties(prefix = "servers")
@Validated
public class ServerConfig {
    @Max(value = 8888, message = "端口最大值不能超过8888")
    private int port;
}
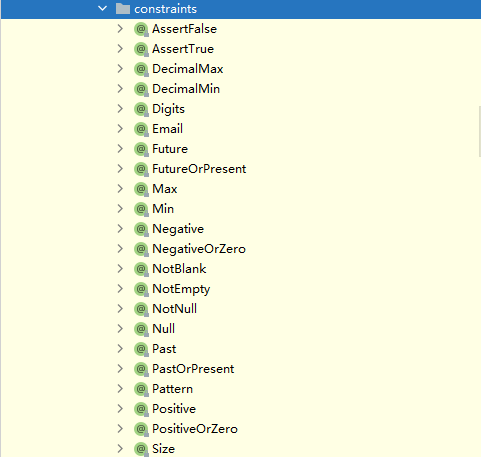 其他校验规则
测试
加载测试专用属性
// properties属性可以为当前测试用例添加临时的属性配置
//@SpringBootTest(properties = {"test.prop=testValue1"})
// args属性可以为当前测试用例添加临时的命令行参数
//@SpringBootTest(args = {"--test.prop=testValue2"})
// 命令行的优先级高于配置文件和properties
@SpringBootTest(args = {"--test.prop=testValue2"}, properties = {"test.prop=testValue1"})
public class PropertiesAndArgsTest {

    @Value("${test.prop}")
    private String msg;

    @Test
    public void test() {
        System.out.println(msg);
    }
}
优势:比多环境开发中的测试环境影响范围更小,仅对当前测试类有效。
加载测试专用配置
使用@Import注解加载当前测试类专用的配置
@SpringBootTest
// 加载测试范围配置应用于小范围测试环境
@Import({MsgConfig.class})
public class ConfigurationTest {
    @Autowired
    private String msg;
    @Test
    public void testConfiguration() {
        System.out.println(msg);
    }
}
public class MsgConfig {
    @Bean
    public String msg() {
        return "new msg...";
    }
}
Web环境模拟测试
模拟端口
@SpringBootTest(webEnvironment = SpringBootTest.WebEnvironment.RANDOM_PORT)
public class WebTest {
    @Test
    public void testRandomPort() {
    }
}
 端口
端口
虚拟请求测试
@SpringBootTest(webEnvironment = SpringBootTest.WebEnvironment.)
// 开启虚拟的MVC调用
@AutoConfigureMockMvc
public class WebTest {
    @Test
    // 注入虚拟MVC调用对象
    public void testWeb(@Autowired MockMvc mvc) throws Exception {
        // 完整请求:http://localhost:8080/books
        // 创建虚拟请求, 当前访问/books
        MockHttpServletRequestBuilder builder = MockMvcRequestBuilders.get("/books");
        // 执行对应的请求
        mvc.perform(builder);
    }
}
@RestController
@RequestMapping("/books")
public class BookController {
    @GetMapping
    public String getById() {
        System.out.println("getById is running...");
        return "springboot";
    }
}
虚拟请求状态匹配
@Test
public void testStatus(@Autowired MockMvc mvc) throws Exception {
    MockHttpServletRequestBuilder builder = MockMvcRequestBuilders.get("/books123");
    ResultActions actions = mvc.perform(builder);

    // 设定预期值 与真实值进行比较, 成功则测试通过, 失败则测试失败
    // 定义本次调用的预期值
    StatusResultMatchers status = MockMvcResultMatchers.status();
    // 预计本次调用成功: 状态200
    ResultMatcher ok = status.isOk();
    // 添加预计值到本次调用过程中进行匹配
    actions.andExpect(ok);
}
 调用失败
调用失败
虚拟请求体(String)匹配
@Test
public void testBody(@Autowired MockMvc mvc) throws Exception {
    MockHttpServletRequestBuilder builder = MockMvcRequestBuilders.get("/books");
    ResultActions actions = mvc.perform(builder);

    // 匹配执行结果(是否预期值)
    // 定义执行结果匹配器
    ContentResultMatchers content = MockMvcResultMatchers.content();
    // 定义预期执行结果
    ResultMatcher result = content.string("springboot123");
    // 使用本次真实执行结果与预期结果进行比对
    actions.andExpect(result);
}
 调用失败
调用失败
虚拟请求体(json)匹配
@Test
public void testJson(@Autowired MockMvc mvc) throws Exception {
    MockHttpServletRequestBuilder builder = MockMvcRequestBuilders.get("/books");
    ResultActions actions = mvc.perform(builder);

    // 匹配执行结果(是否预期值)
    // 定义执行结果匹配器
    ContentResultMatchers content = MockMvcResultMatchers.content();
    // 定义预期执行结果
    ResultMatcher result = content.json("{\"id\":1,\"name\":\"Springboot2\",\"type\":\"Springboot\",\"description\":\"Springboot\"}");
    // 使用本次真实执行结果与预期结果进行比对
    actions.andExpect(result);
}

虚拟请求头匹配
@Test
public void testContentType(@Autowired MockMvc mvc) throws Exception {
    MockHttpServletRequestBuilder builder = MockMvcRequestBuilders.get("/books");
    ResultActions actions = mvc.perform(builder);

    // 匹配执行结果(是否预期值)
    // 定义执行结果匹配器
    HeaderResultMatchers header = MockMvcResultMatchers.header();
    // 定义预期执行结果
    ResultMatcher contentType = header.string("Content-Type", "application/json");
    // 使用本次真实执行结果与预期结果进行比对
    actions.andExpect(contentType);
}

以上出现的所有测试均可以相互组合,从而形成完整的测试。
数据层测试回滚
- 为测试用例添加事务,SpringBoot会对测试用例对应的事务提交操作进行回滚
- 如果想在测试用例中提交事务,可以通过
@Rollback注解设置
@SpringBootTest
@Transactional  // 事物管理
@Rollback(true) // false阻止事务回滚
public class DaoTest {
    @Autowired
    private BookService bookService;
}
测试用例数据设定
测试用例数据通常采用随机值进行测试,使用SpringBoot提供的随机数为其赋值。
testcase:
  book:
    id: ${random.int}
    id2: ${random.int(10)}
    type: ${random.int(10,20)}
    name: 胖虎${random.value}
    uuid: ${random.uuid}
    publishTime: ${random.long}
${random.int}表示随机整数${random.int(10)}表示10以内的随机整数${random.int(10,20)}表示10到20的随机数- 其中
()可以是任意字符,例如[],!!均可
@Component
@ConfigurationProperties(prefix = "testcase.book")
@Data
public class BookCase {
    private int id;
    private int id2;
    private int type;
    private String name;
    private String uuid;
    private long publishTime;
}
 生成的随机测试用例
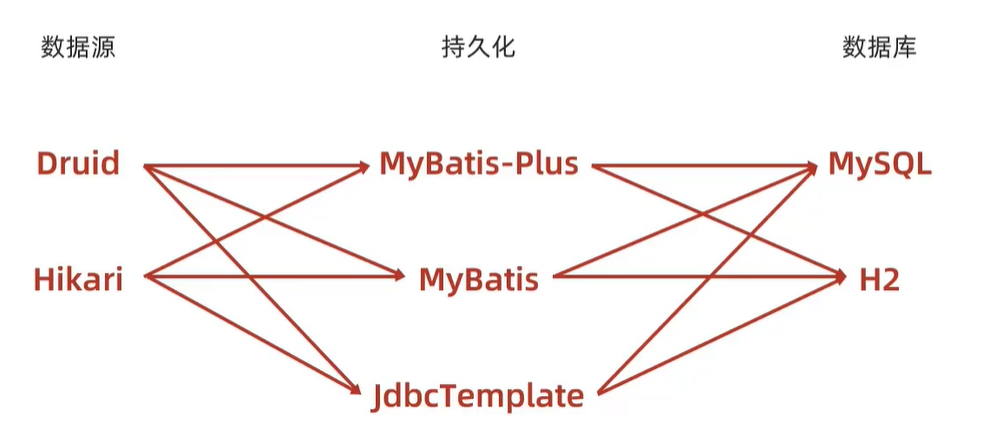
数据层解决方案
SQL
数据源配置
-
SpringBoot提供了3种内嵌的数据源对象
HikariCP:默认内置数据源对象Tomcat提供DataSource:HikariCP不可用的情况下,且在web环境中,将使用tomcat服务器配置的数据源对象Commons DBCP:Hikari不可用,tomcat数据源也不可用,将使用dbcp数据源
-
通用的配置无法设置具体的数据源配置信息,仅提供基本的连接相关配置,如需配置,在下一级配置中设置具体的设定
spring:
  datasource:
    url: jdbc:mysql://localhost:3306/ssm_db?serverTimezone=UTC
    driver-class-name: com.mysql.cj.jdbc.Driver
    username: root
    password: 333
    # 默认使用hikari作为数据源
    hikari:
      maximun-pool-size: 50
持久化技术
内置持久化解决方案---JdbcTemplate
@SpringBootTest
class SpringBoot13SqlApplicationTests {

    @Autowired
    private JdbcTemplate jdbcTemplate;

    @Test
    public void testTemplateSelect() {
        String sql = "select * from tbl_book";
        RowMapper<Book> rm = new RowMapper<Book>() {
            @Override
            public Book mapRow(ResultSet rs, int i) throws SQLException {
                Book book = new Book();
                book.setId(rs.getInt("id"));
                book.setName(rs.getString("name"));
                book.setType(rs.getString("type"));
                book.setDescription(rs.getString("description"));
                return book;
            }
        };
        List<Book> list = jdbcTemplate.query(sql,rm);
        list.forEach(book -> System.out.println(book));
    }
}
<dependency>
    <groupId>org.springframework.boot</groupId>
    <artifactId>spring-boot-starter-jdbc</artifactId>
</dependency>
JdbcTemplate配置
内嵌数据库
- SpringBoot提供了3种内嵌数据库
H2HSQLDerby
内嵌数据库(H2)
-
设置当前项目为web工程,并配置H2管理控制台参数
spring: h2: console: enabled: true path: /h2 -
访问用户名sa,默认密码123456
-
操作数据库(创建表)
create table tbl_book (id int, name varchar, type varchar, description varchar) -
设置访问数据源
spring:
  h2:
    console:
      enabled: true
      path: /h2
  datasource:
    # url 这一项不能放在hikari下面
    url: jdbc:h2:~/test
    # 默认使用hikari作为数据源
    hikari:
      driver-class-name: org.h2.Driver
      username: sa
      password: 123456
数据层解决方案
基于目前所学技术,已经可以做技术选型。
Redis
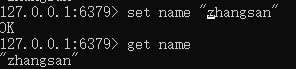
Redis目前使用有一个小的bug,需要先在命令行做如下操作才能连接上。
-
服务端启动(
redis-server.exe redis.windows.conf)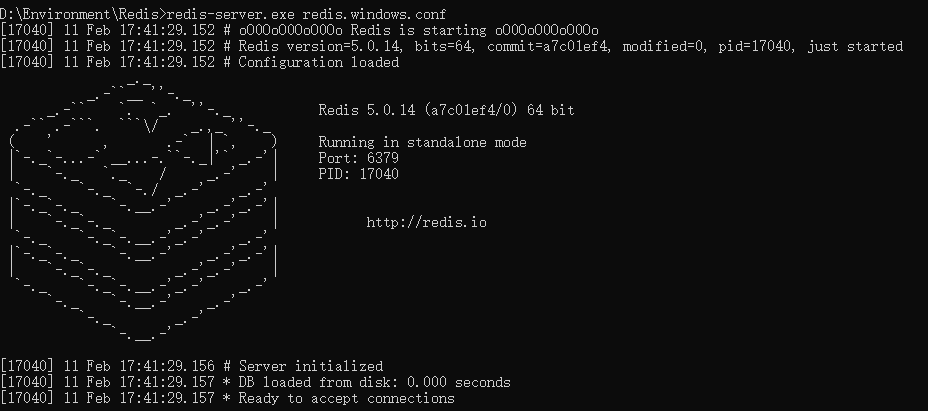 服务端启动redis
 -
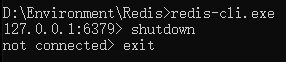
客户端启动(
redis-cli.exe)
SpringBoot整合Redis
-
导入SpringBoot整合Redis坐标
<dependency> <groupId>org.springframework.boot</groupId> <artifactId>spring-boot-starter-data-redis</artifactId> </dependency> -
配置Redis(采用默认配置)
spring: redis: # 下面的配置为默认配置, 可不写 host: localhost # 127.0.0.1 port: 6379 -
操作Redis
使用`RedisTemplate`对象没有办法操作Redis所保存的数据。
@SpringBootTest class SpringBoot14RedisApplicationTests { // 核心 @Autowired private RedisTemplate redisTemplate; @Test public void testSet() { ValueOperations vo = redisTemplate.opsForValue(); vo.set("age", "18"); } @Test public void testGet() { ValueOperations vo = redisTemplate.opsForValue(); Object age = vo.get("age"); System.out.println(age); } @Test public void testHashSet() { HashOperations vo = redisTemplate.opsForHash(); vo.put("testHash", "b", "bb"); } @Test public void testHashGet() { HashOperations vo = redisTemplate.opsForHash(); Object o = vo.get("testHash", "b"); System.out.println(o); } } -
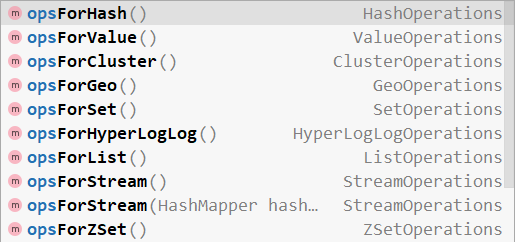 常用操作
常用操作
SpringBoot读写Redis客户端
StringRedisTemplate可以操作客户端数据
@SpringBootTest
public class StringRedisTemplateTest {

    @Autowired
    private StringRedisTemplate stringRedisTemplate;

    @Test
    public void test() {
        ValueOperations<String, String> vo = stringRedisTemplate.opsForValue();
        String name = vo.get("name");
        System.out.println(name);
    }
}
 客户端读取name值
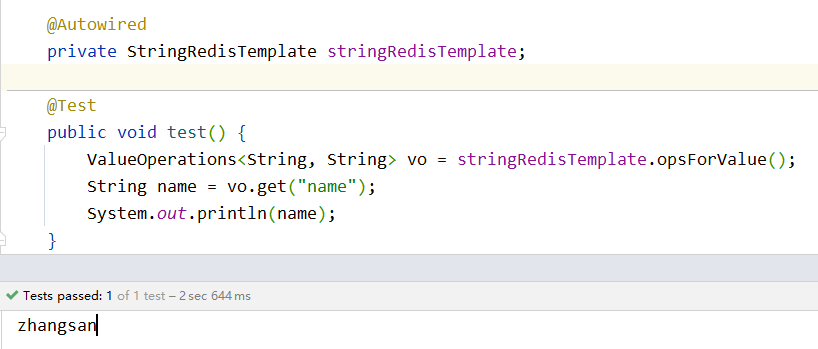 StringRedisTemplate对象读取name值
SpringBoot读写Redis客户端(jedis)
-
导入jedis坐标
<dependency> <groupId>redis.clients</groupId> <artifactId>jedis</artifactId> </dependency> -
配置客户端
spring:
  redis:
    # 下面的配置为默认配置, 可不写
    host: localhost # 127.0.0.1
    port: 6379
    client-type: lettuce
    # 配置专用属性
    lettuce:
      pool:
        max-active: 16
    jedis:
      pool:
        max-active: 16
lettuce与jedis区别:jedis连接Redis服务器是直连模式,当多线程模式下使用jedis会存在线程安全问题,解决方案可以通过配置连接池使每个连接专用,这样整体性能就大受影响。lettcus基于Netty框架进行与Redis服务器连接,底层设计中采用StatefulRedisConnection。StatefulRedisConnection自身是线程安全的,可以保障并发访问安全问题,所以一个连接可以被多线程复用。当然lettcus也支持多连接实例一起工作。
Mongodb
MongoDB是一个开源、高性能、无模式的文档型数据库。
NoSQL数据库产品中的一种,是最像关系型数据库的非关系型数据库。
应用场景
-
淘宝用户数据
- 存储位置:数据库
- 特征:永久性存储,修改频度极低
-
游戏装备数据、游戏道具数据
- 存储位置:数据库、Mongodb
- 特征:永久性存储与临时存储相结合、修改频度较高
-
直播数据、打赏数据、粉丝数据
- 存储位置:数据库、Mongodb
- 特征:永久性存储与临时存储相结合,修改频度极高
-
物联网数据
- 存储位置:Mongodb
- 特征:临时存储,修改频度飞速
基础操作
-
服务端启动
mongod --dbpath=..\data\db -
客户端启动
参数如果遵循默认则可以不指定。
mongo --host=127.0.0.1 --port=27017
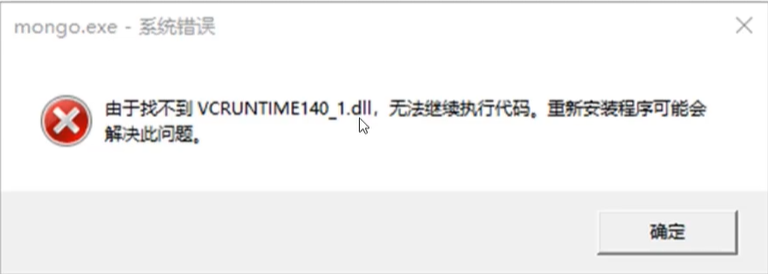
安装过程中可能会出现的问题:
解决方案:
下载对应的dll文件(通过互联网搜索即可)
拷贝到windows安装路径下的system32目录中
执行命令注册对应dll文件
regsvr32 vcruntime140_1.dll
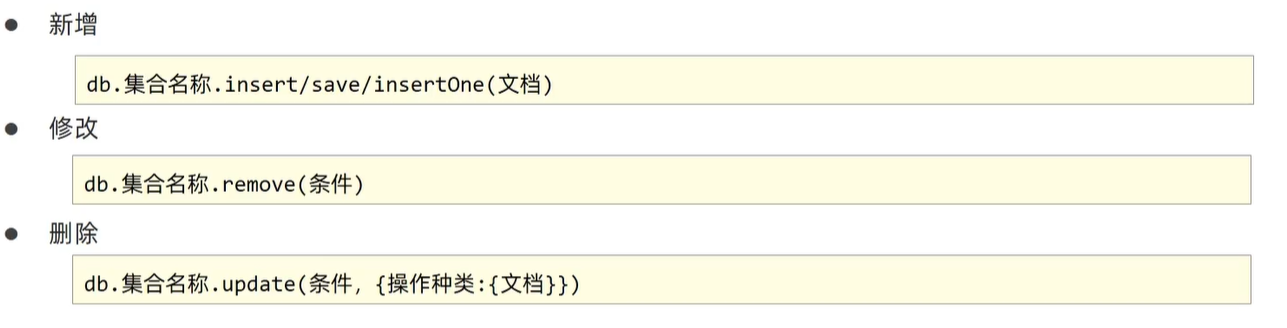
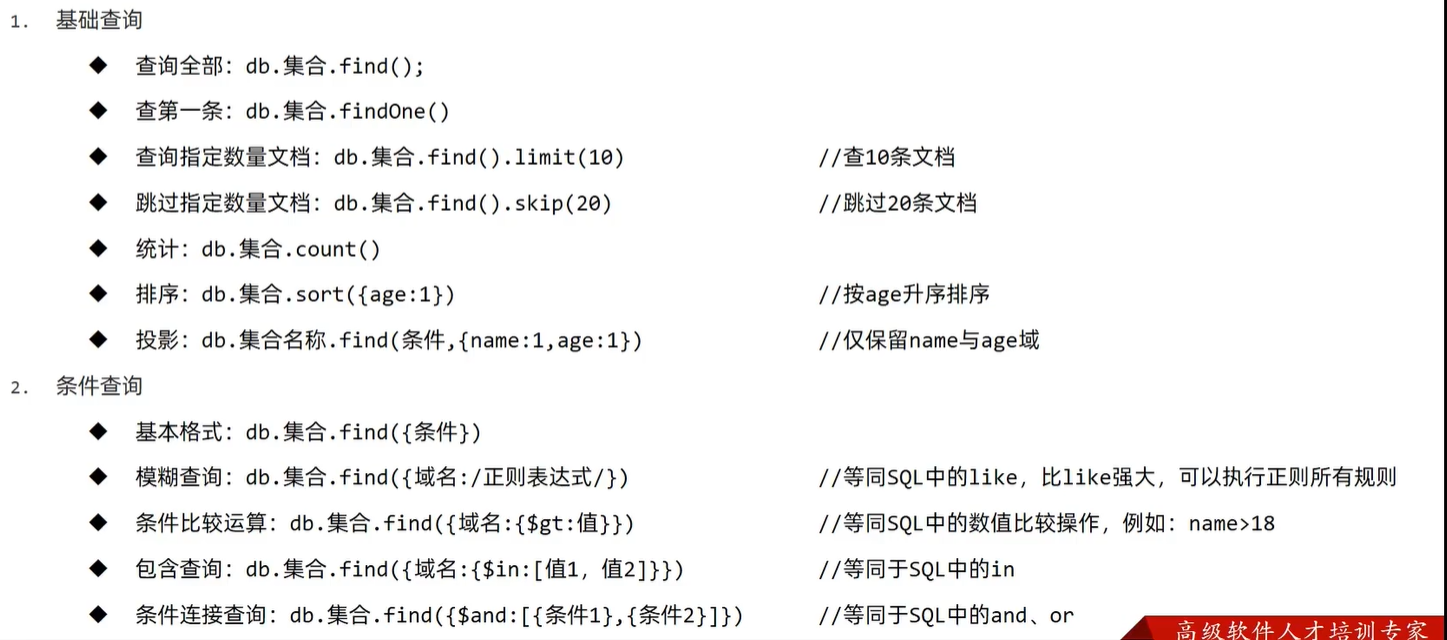
Mongodb基础CRUD
// 添加数据(文档)
db.book.save({"name":"SpringBoot", type: "SpringBoot"})

// 查询
db.book.find()
db.book.find({type:"SpringBoot"})

// 删除
db.book.remove({type: "SpringBoot"})
// 删库跑路
db.book.remove({})

// 修改
db.book.update({name:"SpringBoot"}, {$set:{name:"SpringBoot2"}})
 增删改
增删改
 查
查
SpringBoot整合Mongodb
-
导入SpringBoot整合Mongodb坐标
<dependency> <groupId>org.springframework.boot</groupId> <artifactId>spring-boot-starter-data-mongodb</artifactId> </dependency> -
配置Redis(采用默认配置)
spring: data: mongodb: uri: mongodb://localhost/itheima -
客户端操作Mongodb
@SpringBootTest class SpringBoot15MongodbApplicationTests { @Autowired private MongoTemplate mongoTemplate; @Test void testInsert() { Book book = new Book(); book.setId(2); book.setName("SpringBoot_idea2"); book.setType("SpringBoot_idea2"); book.setDescription("SpringBoot_idea2"); mongoTemplate.save(book); } @Test public void testSelect() { List<Book> books = mongoTemplate.findAll(Book.class); books.forEach(book -> System.out.println(book)); } }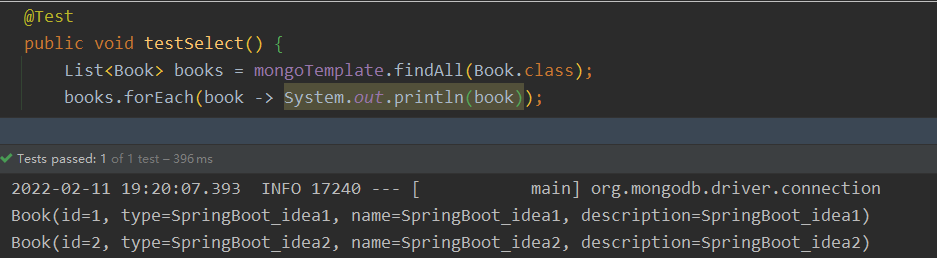 查询
查询
Elasticsearch(ES)
Elasticsearch是一个分布式全文搜索引擎

ES索引操作
-
创建索引
PUT http://localhost:9200/books -
查询索引
GET http://localhost:9200/books -
删除索引
DELETE http://localhost:9200/books -
创建索引并指定规则(规则:按照什么XX来进行分词)
{
    "mappings": {
        "properties": {
            "id": {
                "type": "keyword"
            },
            "name": {
                "type": "text",
                "analyzer": "ik_max_word",
                "copy_to": "all"
            },
            "description": {
                "type": "text",
                "analyzer": "ik_max_word",
                "copy_to": "all"
            },
            "type": {
                "type": "keyword"
            },
            "all": {
                "type": "text",
                "analyzer": "ik_max_word"
            }
        }
    }
}
ES文档操作
创建文档
POST http://localhost:9200/books/_doc  		# 使用系统生成id
POST http://localhost:9200/books/_create/1  # 使用指定id
POST http://localhost:9200/books/_doc/1  	# 使用指定id,不存在创建,存在更新(版本递增)
# 携带参数
{
	"name": "SpringBoot",
	"type": "SpringBoot",
	"description": "SpringBoot"
}
查询文档
GET http://localhost:9200/books/_doc/1  		# 查询单个文档
GET http://localhost:9200/books/_search  		# 查询全部文档
条件查询
GET http://localhost:9200/books/_search?q=name:SpringBoot
删除文档
DELETE http://localhost:9200/books/_doc/1
修改文档(全量修改,覆盖操作)
PUT http://localhost:9200/books/_doc/1
# 携带参数
{
	"name": "SpringBoot",
	"type": "SpringBoot",
	"description": "SpringBoot"
}
修改文档(部分修改)
POST http://localhost:9200/books/_update/1
# 携带参数
{
	"doc": {
		"name": "SpringBoot"
	}
}
SpringBoot整合ES
基础操作
-
导入ES坐标(使用新版,但是SpringBoot还没有适配)
<!--新版本--> <dependency> <groupId>org.elasticsearch.client</groupId> <artifactId>elasticsearch-rest-high-level-client</artifactId> </dependency> -
创建客户端(不能自动装配,需要手搓)
private RestHighLevelClient client; /** * 测试的前置操作--创建客户端 */ @BeforeEach void setUp() { HttpHost host = HttpHost.create("http://localhost:9200"); RestClientBuilder builder = RestClient.builder(host); client = new RestHighLevelClient(builder); } /** * 测试的后置操作--关闭客户端 * @throws IOException */ @AfterEach void tearDown() throws IOException { client.close(); } -
创建索引
/**
 * 创建索引
 * @throws IOException
 */
@Test
public void testCreateIndex() throws IOException {
    // 客户端操作
    CreateIndexRequest request = new CreateIndexRequest("books");
    // 获取操作客户端的索引对象, 调用创建索引操作
    client.indices().create(request, RequestOptions.DEFAULT);
}
创建带分词器的索引
/**
 * 根据ik分词器创建索引
 * @throws IOException
 */
@Test
public void testCreateIndexByIk() throws IOException {
    // 客户端操作
    CreateIndexRequest request = new CreateIndexRequest("books");
    // 设置要执行的操作
    String json = "{\n" +
            "    \"mappings\": {\n" +
            "        \"properties\": {\n" +
            "            \"id\": {\n" +
            "                \"type\": \"keyword\"\n" +
            "            },\n" +
            "            \"name\": {\n" +
            "                \"type\": \"text\",\n" +
            "                \"analyzer\": \"ik_max_word\",\n" +
            "                \"copy_to\": \"all\"\n" +
            "            },\n" +
            "            \"description\": {\n" +
            "                \"type\": \"text\",\n" +
            "                \"analyzer\": \"ik_max_word\",\n" +
            "                \"copy_to\": \"all\"\n" +
            "            },\n" +
            "            \"type\": {\n" +
            "                \"type\": \"keyword\"\n" +
            "            },\n" +
            "            \"all\": {\n" +
            "                \"type\": \"text\",\n" +
            "                \"analyzer\": \"ik_max_word\"\n" +
            "            }\n" +
            "        }\n" +
            "    }\n" +
            "}";
    // 设置请求参数, 参数类型json数据
    request.source(json, XContentType.JSON);
    // 获取操作客户端的索引对象, 调用创建索引操作
    client.indices().create(request, RequestOptions.DEFAULT);
}
添加文档
/**
 * 添加文档(单个)
 */
@Test
public void testCreateDoc() throws IOException {
    Book book = bookDao.selectById(1);
    // 指定索引
    IndexRequest request = new IndexRequest("books").id(book.getId().toString());
    String json = JSON.toJSONString(book);
    request.source(json, XContentType.JSON);
    client.index(request, RequestOptions.DEFAULT);
}
/**
 * 添加文档(批处理)
 */
@Test
public void testCreateDocAll() throws IOException {
    List<Book> books = bookDao.selectList(null);
    // 批处理请求的容器
    BulkRequest bulk = new BulkRequest();
    books.forEach(book -> {
        // 指定索引和id
        IndexRequest request = new IndexRequest("books").id(book.getId().toString());
        String json = JSON.toJSONString(book);
        request.source(json, XContentType.JSON);
        bulk.add(request);
    });
    // 执行
    client.bulk(bulk, RequestOptions.DEFAULT);
}
查询文档
/**
 * 按照id查询
 */
@Test
public void testGetById() throws IOException {
    GetRequest request = new GetRequest("books", "12");
    GetResponse response = client.get(request, RequestOptions.DEFAULT);
    String book = response.getSourceAsString();
    System.out.println(book);
}
/**
 * 查询多个数据
 */
@Test
public void testGetAll() throws IOException {
    // 创建查询book的索引
    SearchRequest request = new SearchRequest("books");

    SearchSourceBuilder builder = new SearchSourceBuilder();
    // 添加查询条件
    // 查询name字段里面含有java的数据
    builder.query(QueryBuilders.termQuery("all", "spring"));
    request.source(builder);

    SearchResponse response = client.search(request, RequestOptions.DEFAULT);
    // 获取所有命中的信息
    SearchHits hits = response.getHits();
    hits.forEach(hit -> {
        String source = hit.getSourceAsString();
        Book book = JSON.parseObject(source, Book.class);
        System.out.println(book);
    });
}
/**
 * 根据id删除
 */
@Test
public void testDeleteById() throws IOException {
    DeleteRequest request = new DeleteRequest("books", "1");
    client.delete(request, RequestOptions.DEFAULT);
}
整合第三方技术
缓存
- 缓存是一种介于数据永久存储介质与数据应用之间的数据临时存储介质
- 使用缓存可以有效的减少低速数据读取过程的次数(例如磁盘IO),提高系统性能
- 缓存不仅可用于提高永久性存储介质的数据读取效率,还可以提供临时的数据存储空间
手工模拟缓存
book
@Autowired
private BookDao bookDao;

// 自定义缓存存储对象
private HashMap<Integer, Book> cache = new HashMap<>();

@Override
public Book getById(Integer id) {
    // 如果当前缓存没有本次要查询的数据, 则进行查询, 否则返回缓存中存在的数据
    Book book = cache.get(id);
    if (book == null) {
        Book queryBook = bookDao.selectById(id);
        cache.put(id, queryBook);
        return queryBook;
    }
    return book;
}
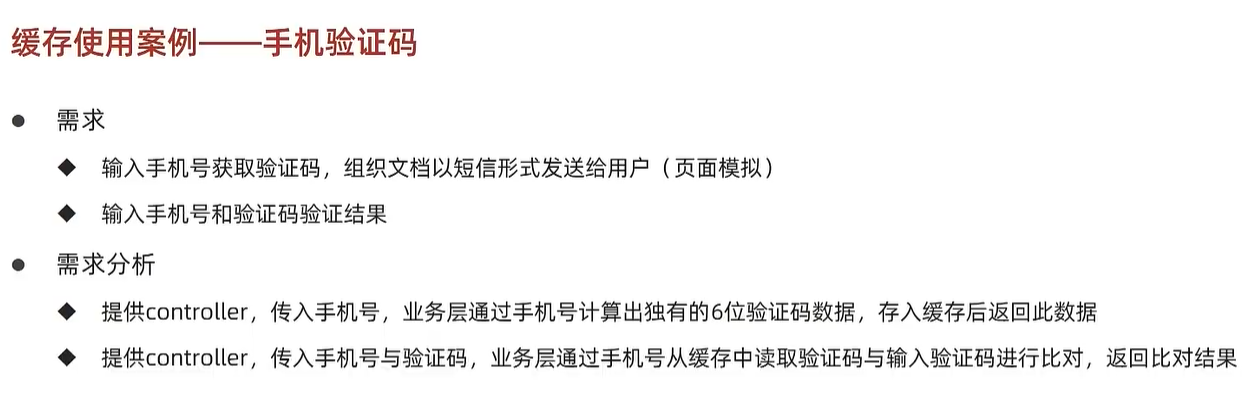
tel
// 缓存
private HashMap<String, String> cache = new HashMap<>();

/**
 * 获取验证码
 * @param tel
 * @return
 */
@Override

public String get(String tel) {
    String code = tel.substring(tel.length() - 6);
    cache.put(tel, code);
    return code;
}

/**
 * 根据验证码进行检验
 * @param tel
 * @param code
 * @return
 */
@Override
public boolean check(String tel, String code) {
    String queryCode = cache.get(tel);
    return code.equals(queryCode);
}
simple(默认)
-
导入cache坐标
<!--cache--> <dependency> <groupId>org.springframework.boot</groupId> <artifactId>spring-boot-starter-cache</artifactId> </dependency> -
启用缓存
@SpringBootApplication // 开启缓存功能 @EnableCaching public class CacheApplication { public static void main(String[] args) { SpringApplication.run(CacheApplication.class, args); } } -
设置当前操作的结果数据进入缓存
第一次操作的时候会从cacheSpace空间的缓存中读取,如果存在则读取,不存在则存放。
@Cacheable(value = "cacheSpace", key = "#id") // 根据ID保存缓存数据
public Book getById(Integer id) {
    return bookDao.selectById(id);
}
以下缓存均需要使用的代码
 项目需求分析
基本代码
默认使用的是simple
// bean
@Data
public class SimCode {
    private String tel;
    private String code;
}
// Service
public interface SimCodeService {
    public String sendCodeToSim(String tel);
    public boolean checkCode(SimCode simCode);
}
// ServiceImpl
@Service
public class SimCodeServiceImpl implements SimCodeService {

    @Autowired
    private CodeUtils codeUtils;

    /**
     * 给手机号发送验证码
     * @param tel
     * @return
     */
    @Override
    // value 指定存放位置
    @CachePut(value = "simCode", key = "#tel") // 这个注解仅仅是保存缓存
    public String sendCodeToSim(String tel) {
        String code = codeUtils.generator(tel);
        return code;
    }

    /**
     * 检验手机号和验证码是否匹配
     * @param 封装的电话实体类
     * @return
     */
    @Override
    public boolean checkCode(SimCode simCode) {
        // 取出内存中的验证码与传递过来的验证码比对, 如果相同, 返回true
        String code = simCode.getCode();
        String cacheCode = codeUtils.get(simCode.getTel());
        return code.equals(cacheCode);
    }
}
// utils
@Component
public class CodeUtils {

    private String[] patch = {"000000", "00000", "0000", "000", "00", "0", ""};

    /**
     * 根据手机号计算出6位随机数字
     * @param tel 传入的手机号
     * @return
     */
    public String generator(String tel) {
        int hash = tel.hashCode();
        int encryption = 20220207;
        long result = hash ^ encryption;
        long nowTime = System.currentTimeMillis();
        result = result ^ nowTime;
        long code = (long) (result % 1e6);
        code = code < 0 ? -code : code;
        String codeStr = code + "";
        int len = codeStr.length();
        // 补零操作
        return patch[len] + codeStr;
    }

    /**
     * 从缓存中读取验证码
     * 注:这个方法如果想生效,必须将其放进容器,走spring处理bean的模式
     * @param tel
     * @return 如果没有数据则返回null
     */
    @Cacheable(value = "simCode", key = "#tel")
    public String get(String tel) {
        return null;
    }

}
// Controller
@RestController
@RequestMapping("/sim")
public class SimCodeController {

    @Autowired
    private SimCodeService simCodeService;

    @GetMapping("{tel}")
    public String getCode(@PathVariable String tel) {
        return simCodeService.sendCodeToSim(tel);
    }

    @PostMapping
    public boolean checkCode(SimCode simCode) {
        return simCodeService.checkCode(simCode);
    }

}
Ehcache
-
加入Ehcache坐标(缓存供应商实现)
<!--ehcache--> <dependency> <groupId>net.sf.ehcache</groupId> <artifactId>ehcache</artifactId> </dependency> -
缓存设定为使用Ehcache
spring: cache: type: ehcache ehcache: config: ehcache.xml -
提供ehcache配置文件ehcache.xml
<?xml version="1.0" encoding="UTF-8"?>
<ehcache xmlns:xsi="http://www.w3.org/2001/XMLSchema-instance"
         xsi:noNamespaceSchemaLocation="http://ehcache.org/ehcache.xsd"
         updateCheck="false">
    <diskStore path="D:\ehcache" />

    <!--默认缓存策略 -->
    <!-- external:是否永久存在,设置为true则不会被清除,此时与timeout冲突,通常设置为false-->
    <!-- diskPersistent:是否启用磁盘持久化-->
    <!-- maxElementsInMemory:最大缓存数量-->
    <!-- overflowToDisk:超过最大缓存数量是否持久化到磁盘-->
    <!-- timeToIdleSeconds:最大不活动间隔,设置过长缓存容易溢出,设置过短无效果,可用于记录时效性数据,例如验证码-->
    <!-- timeToLiveSeconds:最大存活时间-->
    <!-- memoryStoreEvictionPolicy:缓存清除策略-->
    <defaultCache
        eternal="false"
        diskPersistent="false"
        maxElementsInMemory="1000"
        overflowToDisk="false"
        timeToIdleSeconds="60"
        timeToLiveSeconds="60"
        memoryStoreEvictionPolicy="LRU" />
     <!-- name="simCode" 对应上方在向缓存中放入数据时指定的缓存空间 -->
    <cache
        name="simCode"
        eternal="false"
        diskPersistent="false"
        maxElementsInMemory="1000"
        overflowToDisk="false"
        timeToIdleSeconds="10"
        timeToLiveSeconds="10"
        memoryStoreEvictionPolicy="LRU" />
</ehcache>
Redis
-
加入Redis坐标(缓存供应商实现)
<!--redis--> <dependency> <groupId>org.springframework.boot</groupId> <artifactId>spring-boot-starter-data-redis</artifactId> </dependency> -
配置Redis服务器,缓存设定为使用Redis
spring: #--redis-- cache: type: redis # 相关配置 redis: cache-null-values: false # 是否缓存空值 # key-prefix: sms_ # 绑定前缀 time-to-live: 10s # 存活时间 use-key-prefix: true # 是否使用前缀(key) -
Redis服务器相关指令
启动服务器:redis-server.exe redis.windows.conf
启动客户端:redis-cli.exe
清空数据:flushdb
memcached
memcached的安装
- 安装memcached:
memcached.exe -d install(管理员身份运行cmd)- 启动memcached:
memcached.exe -d start- 关闭memcached:
memcached.exe -d stop
-
加入Xmemcache坐标(缓存供应商实现)
<!--xmamcached--> <dependency> <groupId>com.googlecode.xmemcached</groupId> <artifactId>xmemcached</artifactId> <version>2.4.7</version> </dependency> -
配置mamcached服务器必要属性
# memcached配置信息 memcached: # memcached服务器地址 servers: localhost:11211 # 连接池数量 poolSize: 10 # 设置默认操作超时 opTimeout: 3000 -
创建读取属性配置信息类,加载配置
@Component @ConfigurationProperties(prefix = "memcached") @Data public class XMemcachedProperties { private String servers; private Integer poolSize; private Long opTimeout; } -
创建客户端配置类
@Configuration public class XMemcachedConfig { @Autowired private XMemcachedProperties xMemcachedProperties; @Bean public MemcachedClient getMemcachedClient() throws IOException { // 配置相关参数信息 MemcachedClientBuilder memcachedClientBuilder = new XMemcachedClientBuilder(xMemcachedProperties.getServers()); memcachedClientBuilder.setConnectTimeout(xMemcachedProperties.getOpTimeout()); memcachedClientBuilder.setConnectionPoolSize(xMemcachedProperties.getPoolSize()); MemcachedClient memcachedClient = memcachedClientBuilder.build(); return memcachedClient; } } -
配置mamcachd属性
@Autowired
private MemcachedClient memcachedClient;

/**
 * 将数据放入缓存
 * @param tel
 * @return
 */
@Override
public String sendCodeToSim(String tel) {
    String code = codeUtils.generator(tel);
    try {
        memcachedClient.set(tel, 10, code); // 0代表永不过期
    } catch (Exception e) {
        e.printStackTrace();
    }
    return code;
}

/**
 * 将数据从缓存读出
 * @param simCode
 * @return
 */
@Override
public boolean checkCode(SimCode simCode) {
    String code = null;
    try {
        code = memcachedClient.get(simCode.getTel());
    } catch (Exception e) {
        e.printStackTrace();
    }
    return simCode.getCode().equals(code);
}
jetcache(阿里)
jetCache对SpringCache进行了封装,在原有功能基础上实现了多级缓存、缓存统计、自动刷新、异步调用、数据报表等功能。
jetCache设定了本地缓存与远程缓存的多级缓存解决方案
- 本地缓存(local)
- LinkedHashMap
- Caffeine
- 远程缓存(remote)
- Redis
- Tair
-
加入jetcache坐标
<!--jetcache--> <dependency> <groupId>com.alicp.jetcache</groupId> <artifactId>jetcache-starter-redis</artifactId> <version>2.6.2</version> </dependency> -
配置远程缓存的必要属性
# 配置jetcache相关参数 jetcache: remote: default: # 默认配置 type: redis # 使用redis host: localhost port: 6379 # redis 默认端口 poolConfig: # 必须的属性 maxTotal: 50 sim: # 其他配置 type: redis host: localhost port: 6379 # redis 默认端口 poolConfig: # 必须的属性 maxTotal: 50 -
配置本地缓存的必要属性
jetcache:
  local:
    default: # 默认配置
      type: linkedhashmap
      keyConvertor: fastjson
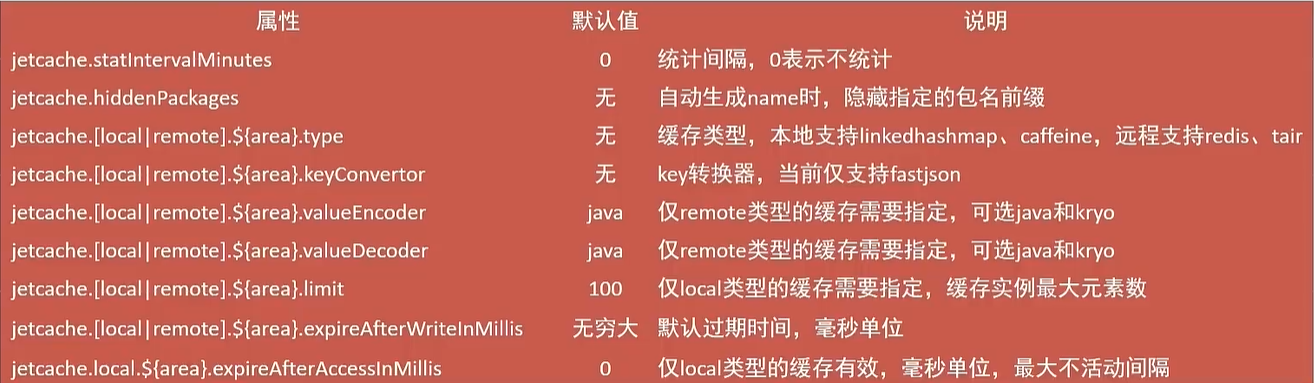 配置属性说明
-
开启jetcache注解支持
@SpringBootApplication // jetcache启用缓存的主开关 @EnableCreateCacheAnnotation public class JetCacheApplication { public static void main(String[] args) { SpringApplication.run(SpringBoot18JetCacheApplication.class, args); } } -
声明缓存对象
@Service public class SimCodeServiceImpl implements SimCodeService { @Autowired private CodeUtils codeUtils; /** * name: 指定名字 * expire: 到期时间(s) * timeUnit: 时间单位 */ // remote // @CreateCache(area = "sim", name = "jetCache_", expire = 10, timeUnit = TimeUnit.SECONDS) // local // cacheType指定本地缓存,默认是远程缓存,都缓存是both @CreateCache(cacheType = CacheType.LOCAL,name = "jetCache_", expire = 1000, timeUnit = TimeUnit.SECONDS) private Cache<String, String> jetCache; } -
操作缓存
@Service
public class SimCodeServiceImpl implements SimCodeService {
    // 将数据存放到缓存
	@Override
    public String sendCodeToSim(String tel) {
        String code = codeUtils.generator(tel);
        jetCache.put(tel, code);
        return code;
    }

    // 将数据从缓存中取出
    @Override
    public boolean checkCode(SimCode simCode) {
        String code = jetCache.get(simCode.getTel());
        return simCode.getCode().equals(code);
    }
}
jetcache启用方法注解
-
启用方法注解
@SpringBootApplication // jetcache启用缓存的主开关 @EnableCreateCacheAnnotation // 开启方法注解缓存 @EnableMethodCache(basePackages = "xyz.teng") public class SpringBoot18JetCacheApplication { public static void main(String[] args) { SpringApplication.run(SpringBoot18JetCacheApplication.class, args); } } -
shi用方法注解操作缓存
@Service public class BookServiceImpl implements BookService { @Autowired private BookDao bookDao; @Override @Cached(name = "book_", key = "#id", expire = 3600, cacheType = CacheType.REMOTE) @CacheRefresh(refresh = 5) // 5秒执行一次该操作 public Book getById(Integer id) { return bookDao.selectById(id); } @Override // 当执行更新操作的时候,缓存里面的内容也同步更新 @CacheUpdate(name = "book_", key = "#book.id", value = "#book") public boolean update(Book book) { return bookDao.updateById(book) > 0; } @Override // 当执行删除操作的时候,缓存里面的内容也同步删除 @CacheInvalidate(name = "book_", key = "#id") public boolean delete(Integer id) { return bookDao.deleteById(id) > 0; } } -
缓存对象需要保证是可序列化的
@Data
public class Book implements Serializable {
    private Integer id;
    private String type;
    private String name;
    private String description;
}
jetcache: remote: default: # 默认配置 type: redis # 使用redis # ---下面这三个需要同步配置--- keyConvertor: fastjson valueEncode: java valueDecode: java
查看缓存报告统计
jetcache:
# 开启统计数据
statIntervalMinutes: 1 # 1分钟
j2cache
j2cache是一个缓存整合框架,可以提供缓存的整合方案,使各种缓存搭配使用,自身不提供缓存功能
基于 ehcache + redis 进行整合
-
加入j2cache坐标,加入整合缓存的坐标
<dependency> <groupId>net.oschina.j2cache</groupId> <artifactId>j2cache-core</artifactId> <version>2.8.4-release</version> </dependency> <dependency> <groupId>net.oschina.j2cache</groupId> <artifactId>j2cache-spring-boot2-starter</artifactId> <version>2.8.0-release</version> </dependency> <dependency> <groupId>net.sf.ehcache</groupId> <artifactId>ehcache</artifactId> </dependency> -
配置使用j2cache(application.yml)
j2cache: config-location: j2cache.properties -
配置一级缓存与二级缓存以及一级缓存数据到二级缓存的发送方式(j2cache.properties)
# 一级缓存 j2cache.L1.provider_class = ehcache # 指定ehcache配置文件 ehcache.configXml = ehcache.xml # 关闭二级缓存 j2cache.l2-cache-open = false # 二级缓存(全类名) j2cache.L2.provider_class = net.oschina.j2cache.cache.support.redis.SpringRedisProvider # 这个地方的 redis 影响下面配置属性的名字 j2cache.L2.config_section = redis redis.hosts = localhost:6379 # 配置一级缓存数据到二级缓存的广播方式: 可以使用redis提供的消息订阅模式, 也可以使用jgroups多播实现 j2cache.broadcast = net.oschina.j2cache.cache.support.redis.SpringRedisPubSubPolicy redis.mode = single # 配置命名空间 redis.namespace = j2cache -
设置使用缓存
@Service
public class SimCodeServiceImpl implements SimCodeService {

    @Autowired
    private CodeUtils codeUtils;

    @Autowired
    private CacheChannel cacheChannel;

    @Override
    public String sendCodeToSim(String tel) {
        String code = codeUtils.generator(tel);
        cacheChannel.set("sim", tel, code);
        return code;
    }

    @Override
    public boolean checkCode(SimCode simCode) {
        String code = cacheChannel.get("sim", simCode.getTel()).asString();
        return simCode.getCode().equals(code);
    }
}